1) Basic information
2) Connection topology
3) Technical specification
4) IDEXX VetLab station configuration
5) VetAIS configuration
5.1 Technical settings in Connectivity manager
5.2 Laboratory values settings
6) Exporting and importing mechanism
6.1) generating a request
1) Basic information
This manual describes how to connect IDEXX laboratory system into VetAIS. VetAIS uses for propoper communication new IDEXX PC software called IDEXX VetLab station version 2.0.
Please ask your local IDEXX distributor for VetLab station software.
2) Connection topology
Proper connection topology included:
- a) local IDEXX laboratory devices
- b) PC station with IDEXX VetLab Station software installed
- c) PC station with VetAIS software installed
With new VetLab station system are all laboratory devices connected to PC station specified in point (b). Information exchange with VetAIS is directly between VetLab station and VetAIS.
VetAIS is not directly connected to laboratory devices.
3) Technical specification
VetAIS is connected with VetLab station via proper network LAN connection via ethernet cable of WiFi connection, for better performance we propose to use ethernet network instead of WiFi.
4) IDEXX VetLab station configuration
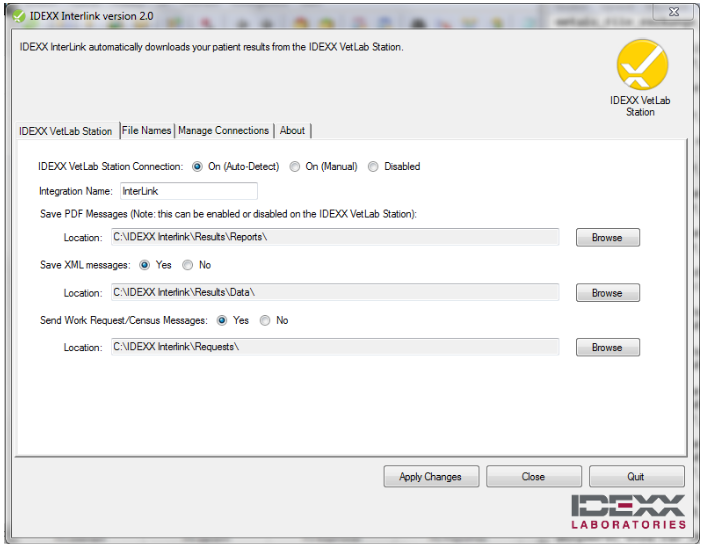
VetLab station including two important settings for file exchange path and file mask.
File path need to be configured as is on image bellow, this settings is default in VetLab station.

VetLab station file path setting
Second settins is for exchanged filenames mask, please use this settings:
Naming of PDF:
<PIMS Client ID>_<PIMS Patient ID>_<Client Last Name>_<Patient Name>_<Work Request Requisition Number>
Naming of XML:
<PIMS Client ID>_<PIMS Patient ID>_<Client Last Name>_<Patient Name>_<Work Request Requisition Number>

File naming settings
5) VetAIS configuration
VetAIS use two kind of settings for proper cooperation with VetLab Station.
5.1 Technical settings in Connectivity manager

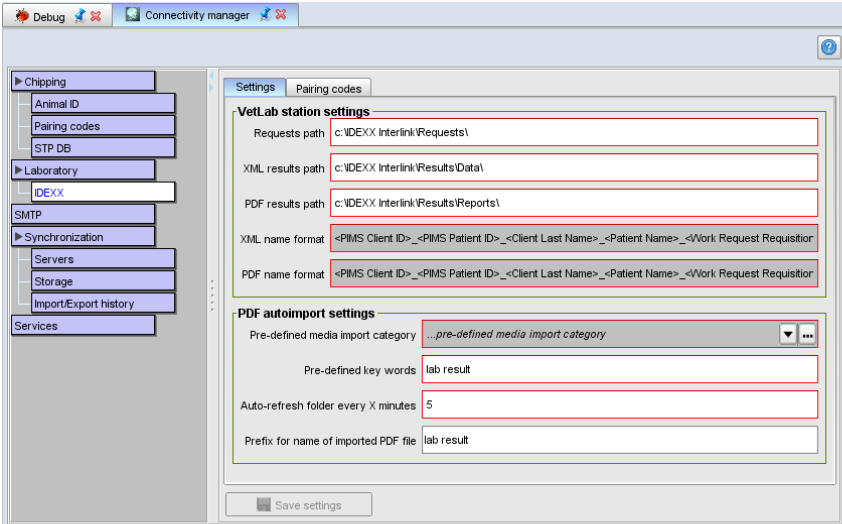
VetAIS connectivity manager
Please check or set these settings:
- a) requests path — keep default value if you do not need change
- b) XML and PDF results path — keep default value if you do not need change
- c) XML and PDF name format — this values are not possible to changes as VetAIS need this information for right pairing requests and results
PDF autoimport settings:
For each results VetAIS import PDF file generated by VetLab station a complete text result. This file is imported as media file in Medical module.
For autoimport you need to set:
- a) pre-defined media category: in Medical module you can have more media categories, here in this combo value you can set to what category will be file imported, we propose to create special category for example “lab. results”
- b) pre-defined key words: similar to category each imported media file can including key words, here you can define what words to use (if any)
- c) auto-refresh folder: set period to automatic checking of VetLab folders for automatic results import
- d) imported PDF name prefix: setting for file name of imported PDF result, this preffix is followed then with YYYY-MM-DD suffix of imported result
5.2 Laboratory values settings
Настройка лабораторных значений!
6) Exporting and importing mechanism
6.1) generating a request
For succesful generating a laboratory examination request user need to:
- a) create lab. request in VetAIS and put some schemas
- b) in header request set type of electronic request as IDEXX Interlink
- c) after finishing request send it via button: “Send el.reqest»
After that, if all setting
Настройка Ветаис
Решение проблем:
— Проверить библиотеку направлений если там появляются
— проверить библиотеку результатов, idexx vetlab иногда создает PDF!!!!!
— проверить winfows system log куда idexx vetlab делает записи
